
Introduction
The Caramel Apple Upside Down Cake is a classic, cozy dessert that brings the comforting flavors of fall right to your table. Featuring tender apples caramelized to perfection under a rich buttery cake, this dessert makes a stunning centerpiece for your Thanksgiving celebration or any autumn gathering.
Cooking Tips
- Use firm but ripe apples like Granny Smith or Honeycrisp to maintain texture after baking.
- For extra caramel depth, lightly toast the sugar in the pan before adding butter and apples.
- Allow the cake to cool slightly before inverting to prevent the caramel from running off.
- If your apples brown too quickly during prep, toss them in a little lemon juice to maintain color.
Serving Suggestions
Serve this cake warm or at room temperature with a scoop of vanilla ice cream or a dollop of whipped cream to complement the caramel and apple flavors.
Storage
Store any leftovers covered in the refrigerator for up to 3 days. Reheat gently in the microwave or oven to restore the lovely gooey texture.
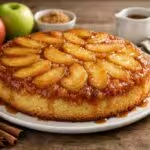
A warm, tender cake featuring caramelized apples baked on the bottom and flipped to create a beautiful top layer. Perfect for Thanksgiving dessert, this recipe combines classic fall flavors with a moist buttery cake base.
Ingredients
- 6 medium apples peeled, cored and sliced
- 1/2 cup unsalted butter plus extra for the pan
- 3/4 cup brown sugar packed
- 1 1/2 cups all-purpose flour
- 1 1/2 teaspoons baking powder
- 1/2 teaspoon salt
- 1/2 cup granulated sugar
- 2 large eggs room temperature
- 2 teaspoons vanilla extract
- 1/2 cup milk room temperature
Instructions
- Preheat the oven to 350 degrees F (175 degrees C). Butter a 9-inch round cake pan.
- In a saucepan over medium heat, melt 1/2 cup butter and brown sugar until bubbling and combined. Pour this caramel mixture evenly into the prepared pan.
- Arrange the apple slices tightly over the caramel in a single layer.
- In a medium bowl, whisk together the flour, baking powder, and salt.
- In a large bowl, beat the granulated sugar and eggs until pale and fluffy. Mix in vanilla extract.
- Alternately add the flour mixture and milk to the egg mixture, beginning and ending with flour, mixing just until combined.
- Pour the batter evenly over the apple layer in the pan and smooth the top.
- Bake for 40-45 minutes or until a toothpick inserted into the center comes out clean.
- Allow the cake to cool for about 10 minutes in the pan. Run a knife around the edge to loosen.
- Invert the cake onto a serving plate carefully and let it sit for a few minutes before serving.
Notes
This cake is best served warm and fresh but can be stored in the fridge covered for up to 3 days. To reheat, warm gently to maintain gooey caramel texture. Choose crisp apples for the best texture contrast.
Make sure your apples are thinly sliced and tightly packed. This helps the caramel soak into them better, giving a richer flavor and a beautiful glossy finish once inverted.
Serving this cake with a scoop of vanilla ice cream really elevates it. The contrast between warm caramel and cold cream is delightful and perfect for fall gatherings.
I think the bake time is off? Mine was still wet in the center at 45 minutes. Had to go like 10 more minutes and the top got darker than I wanted. Not bad overall, just temper expectations.
Pretty good, but I think I messed up the timing. Mine was a bit too dark on top at 45 min and the caramel tasted slightly burnt. Still tasted like fall though.
I don’t have room temp milk or eggs, so I used cold—cake was still good but a bit denser. Lesson learned: room temp matters.
Huh, mine came out perfect with cold milk/eggs once 🤷♂️ maybe it depends on how cold and how long you beat. Still, your note is super helpful.
Thanks for sharing! I always forget about room temp ingredients. Denser cake makes total sense—next time I’ll plan ahead (or warm them in a pinch).
I followed the recipe but my middle was a tiny bit underdone at 40 minutes (maybe my oven runs cool). I added 5 more minutes and it fixed it. The apples cooked down nicely.
The instructions say 350F for 40–45 mins, but mine was still wet in the center at 45. I ended up going closer to 55. Not a disaster, just took longer than expected.
The caramel part got a little grainy on my end—could be I didn’t let the sugar fully melt when it started bubbling. Still tasted good, but the texture wasn’t as glossy as I expected.
Why do we need both brown sugar and granulated? Seems kinda redundant. But I guess the granulated is for the cake crumb? It turned out fine, I just don’t love extra steps.
I made this for fall and it’s officially my go-to now. The caramel smell fills the whole house. Also, flipping it worked perfectly—just don’t rush the cooling time.